Here you can store CTC / Salary information of all the employees. Different earning, deduction and statutory components, created using “Payroll Configuration Wizard”, are displayed here to enter the values.
Salary Master allows you to add / edit salary details of employees with revision dates. Thus multiple salary revisions of employees with its effective dates can be maintained.
While processing payroll, system takes data from Salary Master and prorate the same based on attendance of the employee to calculate payable salary for the month.
Kindly refer to the image for better understanding.
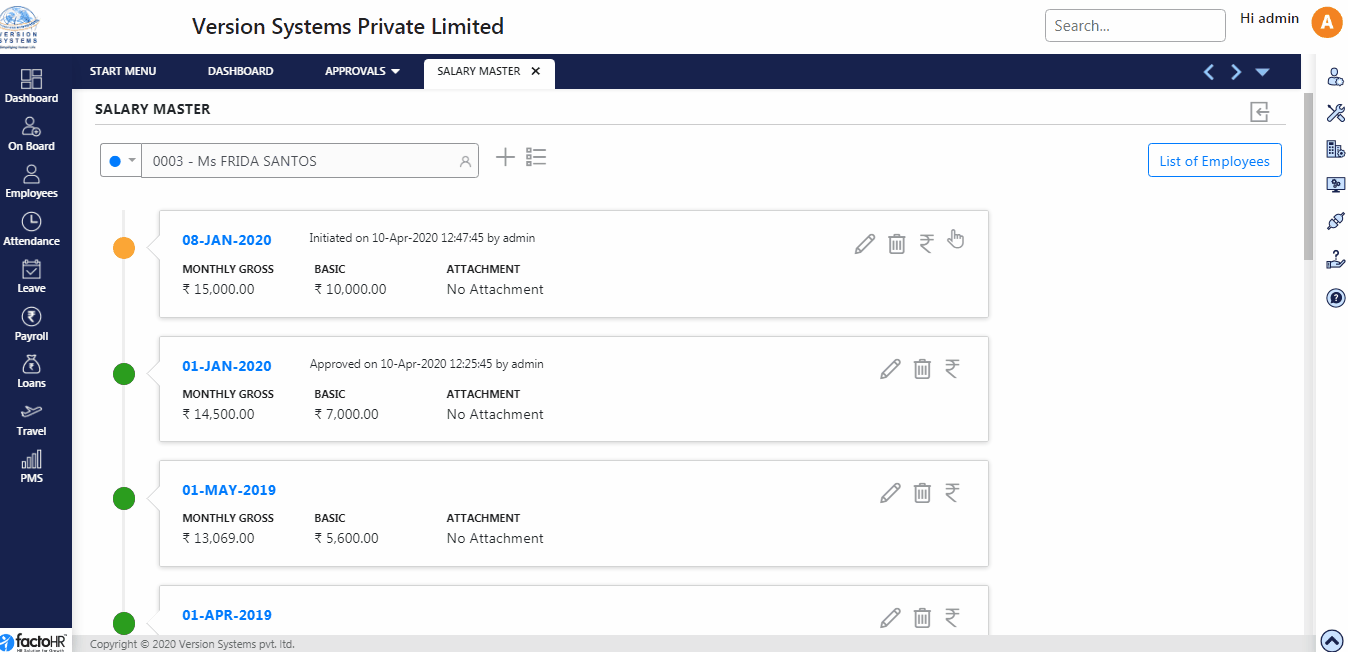
- Search employee name in a search box, on top left of the salary master screen, and select it.
- There is a drop down button on the left of the search box to select Active or InActive Employees.
- To Add New salary revision for the selected employee, click on + icon. There is a list button to view the list of different approved salary revisions with component wise values
- Below the search control, all the salary revisions of the selected employee are displayed in separate panels reflecting CTC, Monthly Gross, Basic salary and Attachment.
- There are buttons provided to edit or delete salary which are displayed on the panel. To view CTC click on Rupee icon, a pop-up window will appear that will display salary structure.
- If workflow rule is set then system will ask for approval for revision else it will directly display approved salary.
- If salary revision is approved by the manager then green color circle will be displayed on the left side of the panel otherwise orange circle will be displayed which means salary revision is unapproved.
- If revision is unapproved then other salary revision cannot be edited or deleted. First approve or reject revisions then you can be able to alter other revisions.
- While adding salary for the selected employee, mention revision date in Date field, from this date salary will come into effect.
- From Attachment you can upload employee’s Offer letter, Appointment letter, etc. This option is not available in template.
- There are various components of wages like Basics, HRA, where you can manually enter salary.
- Under Pay Basis select wage type like monthly, weekly, etc. In Amount column enter value for any particular component into the text box.
- Yearly salary will be displayed under Annually column.
- For some salary components formula is used in Payroll Configuration Wizard, for that component textbox will be disabled. A button is placed under Manually column box next to such textbox. If you want to update the predefined salary in that textbox then click the button, it will enable the box to change the value.
- For the First Time this textbox will be blank but it’s value will add into salary once it gets approved by Admin. From second time the which was added last time will get reflected in this textbox.
- Every section like regular earnings, variable earning has sub-total bar to view the total of that section.
- Two buttons are provided to save salary. To save new salary or updates click Save button.
- If you have created multiple salary for some employee and want to fix one of the salary for the next salary payment then click on Save & Update Future Revisions button. For E.g., Different Salary revision made for January, February and March. But then to apply single revision into all these month, select month and click on Save & Update Future Revision, so the single revision will be apply to all these month and future months till other revisions are done.
- Once you save the salary it will open previous screen and it will display the list of salary created.

- There are few buttons on top right hand side of the salary master screen.
- First button is Lock button that will allow you to lock salary for particular period. When you click this button, a small pop up window will appear. Enter Start and Date, remarks and click on Lock Data button. Once locked you will not be able to update or delete that period salary of any employee. To unlock salary, click on lock button, enter date, and click on Unlock Data button.
- Second button is for upload from which you can upload data in bulk. Download template and fill salary for all employees in the relevant columns and upload it.
- Third button is for insurance, it will download template, fill in the insurance related information employee wise and upload the file from the same button. This is useful where company is deducting insurance premium and paying on behalf of employees.

Previous Step:- Employee Master Next Step:- PF & ESIC details