Creating employee profiles in factoHR is a simple process. Follow the steps below to complete the process:
- To create an employee, go to Organizations > Employee > Employee Master, or simply search for ‘Employee Master’ in the search bar.
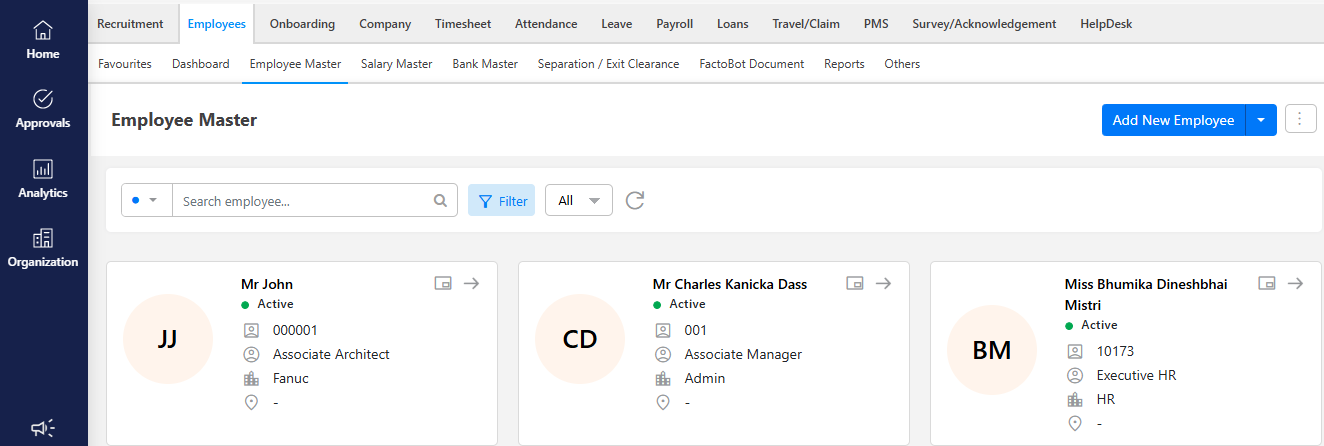
- Before creating a new employee record, you can verify if the employee already exists by checking the Employee Directory. This screen allows you to search for employees by their Employee Code or Name. Additionally, you can use the button next to the search box to filter employees by category or status, such as Active, Inactive, Deactivated, and more.
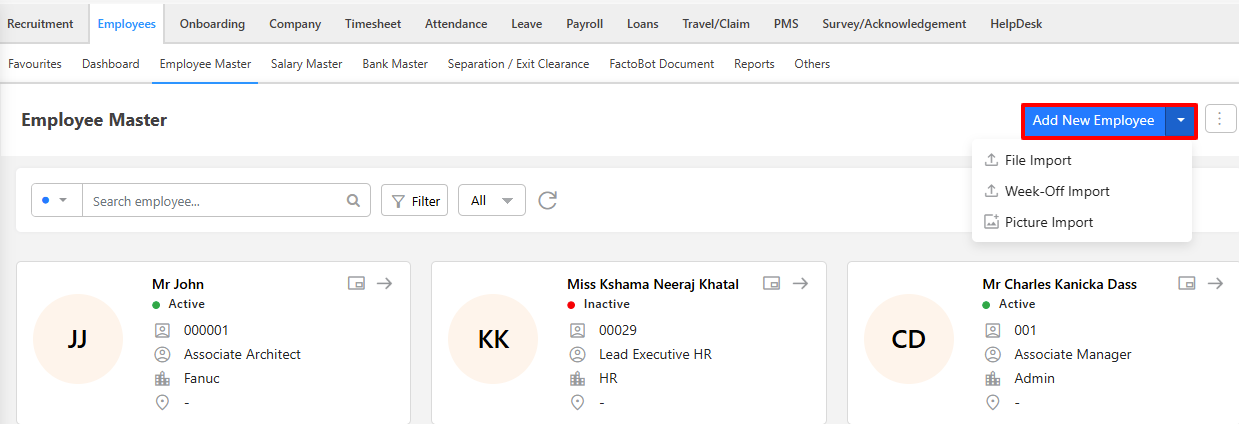
- There are two ways to create an employee:
- Add New Employee and
- File Import
In this section, we will cover how to manually create an employee using the ‘Add New Employee’ option.
- Click ‘Add an Employee’ on the Employee Master screen.

- A wizard screen will appear, prompting you to fill in the employee’s basic details.
- In the first screen, fill in the basic employee details:
- Employee Code: The Employee Code is a unique identifier that can be automatically generated by the system or entered manually. This code is important for tracking attendance, payroll, leave, and other employee-related details. (Mandatory)
- Title: From the dropdown menu, select the appropriate title for the employee, such as Mr. or Miss.
- First Name: Enter the employee’s first name. (Mandatory)
- Middle Name: Enter the employee’s middle name.
- Last Name: Enter the employee’s last name.
- Short Name: If you wish to add a short name for an employee.
- Gender: Select gender from the dropdown. (Mandatory)
- Date of Birth: Enter the employee’s date of birth. (Mandatory)
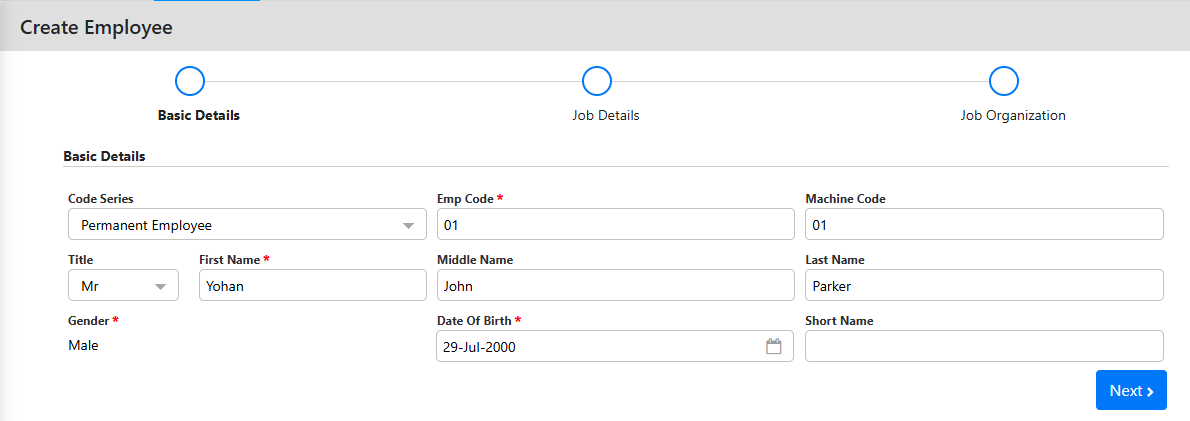
- Once you’ve entered the employee’s basic details, click the “Next” button to continue.
- In the second screen, fill in the Job Details for the employee you are creating:
- Date of joining: Employee’s joining date (Mandatory)
- Contract Type: Type of employee contract, such as trainee, intern, apprentice, etc.
- Expected Confirmation Date: The date when your probation is expected to end and your employment may be confirmed.
- Group Joining Date: If you have a group of companies, you can use this field to enter their actual date of joining the group.
Note: This field is used when multiple companies are connected under one group. It helps keep track of the employee’s original date of joining, even if the employee is transferred between different companies within the group.
- Gratuity Start Date: The official start date used to determine the length of service for gratuity entitlement under company policy or law.
- Probation Period (in days): Specify the duration of the probation period.
- Reporting Manager: Specify the employee’s reporting manager.
- Approving Manager: Specify the employee’s approving manager.
- PAN No: Enter the employee’s PAN number.
- AADHAR Card Number: Enter the employee’s AADHAR card number.
NOTE: When you enter the Date of Joining, the Group Joining Date and Gratuity Start Date fields will be automatically filled with the same date.
- After entering the employee’s job details, click the “Next” button to proceed.
- In the second screen, fill in the Organization information for the employee.
- The categories displayed under Job Organization are defined and managed through the Categories screen based on the organization’s requirements.
- Generally, the mandatory fields required for any organization include:
- Department
- Designation
- Location
- Grade
- Once you enter the details, you’ll receive a confirmation message: “Employee successfully created with Employee code: XX1.”
- After clicking on the Submit button, the employee profile will be displayed on the screen.
Note: Fields mentioned in this wizard may vary depending on the organization.
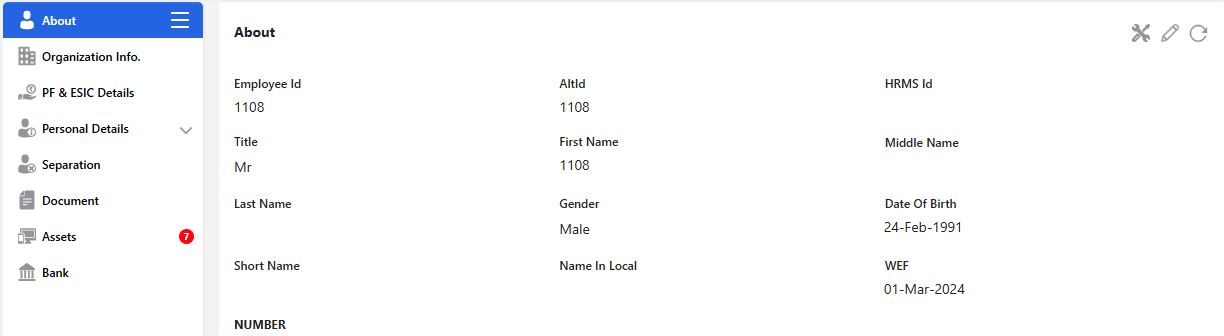
- You can view and edit an employee’s information directly from this screen.
- In the About section, click the pen icon at the top-left corner to open the edit screen. From there, you can update the employee’s basic details and the information of their approving or reporting manager.
- Once an employee is added, they can view and update their basic information, including personal details, past employment history, and supporting documents, through the Employee Self-Service (ESS) portal.
Note: If you have also opted for the onboarding module, you can avoid manually creating employees and automatically update data from onboarding to the employee master.
Note: If approval is enabled, simply saving the entry isn’t enough. You need to submit it for review and approval to complete the process.