Employees are entitled to claim various types of leaves like Privilege Leave, Casual Leave, Sick Leave and others.
This screen will help you to create and configure different Leave Policy based on which entitlement of employees and other rules for leaves are defined. Under each Leave Policy there will be set of Leave Types. By default there will be few leaves type available in the system. You may create other types of leave based on your requirement.
Leave policy define rules like when and how many leave employees can get, rules for leave Accrual, Approval workflow, Leave Balance carry forward at year end etc.
By default one Leave policy is already created into the system which you can edit or create a new policy.
Please refer to the image

- To create a new Leave Policy click on Add New, a pop-up window will appear.
- Enter name of the policy and if you want to make it Default then click on checkbox and click Save.
- A new policy get listed on the page.
- To configure it click on edit, a small pencil icon on right side, so a new window will appear.
- Here you can edit name of the policy and whether to keep it as default or not and click on Save.
- One Policy should be selected as Default otherwise it will give an error.
- Already created leave types and system default leave types are listed to configure. There are two button under Action column, those are to edit configuration of leave type and to delete it.
- Policy rules are to be configured for each required Leave Types. If you want to create a new Leave Type then click on View Leave Type Master.
- Here you can view list of Leave Types created and edit it. To create New Leave Type click Add New button on top right hand side of Manage Leave Policy screen.
- A screen will appear to enter Leave Type Details.
- Enter Leave Code, Leave Name and select Attendance Component from drop down list
- Select Day or Hourly Leave type from Leave Measurement and click on Save.
- Once you have created a leave type close the this screen and it will take to the Policy Detail screen where you can chose a leave type to configure.
- Click on Configure Leave button so a new window will open with six steps.
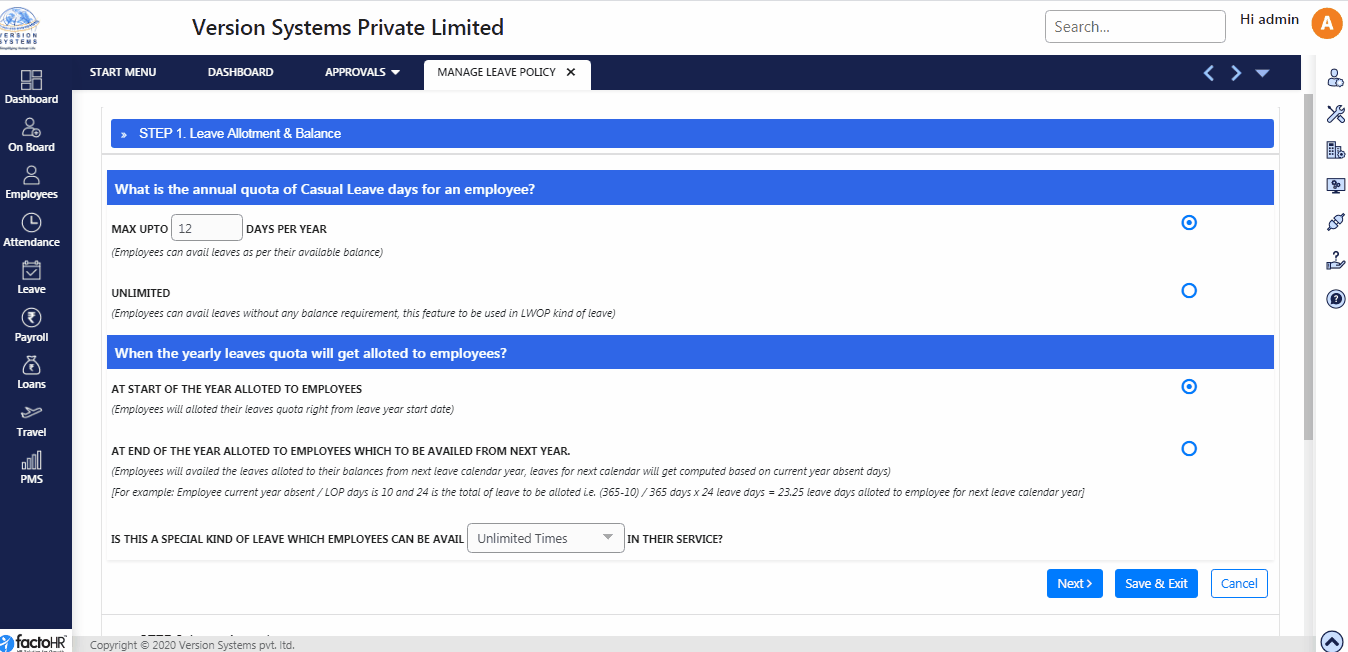
- STEP 1 – Leave Allotment & Balance. To apply leave, employee needs to have leave balance for any leave type.
- Here two option are provided so you can enter maximum number to days an employee can take leave in a year or select unlimited option. In unlimited option employees can get Leave without leave balance. Use this option in Leave Without Pay kind of leave.
- Then there are options to select when the leave quota will be allotted – At Start or End of the year.
- If you select Leave Allotment at the End of year then current year total absents will be calculated and some percentage will be deducted from next year leave balance.
- From third option you can select how many time employees can avail any leave. For e.g., If it is Privilege leave then you can select unlimited times, if it is for marriage or maternity/paternity leave then you can select once, twice or thrice in a serves as per you company’s policy.
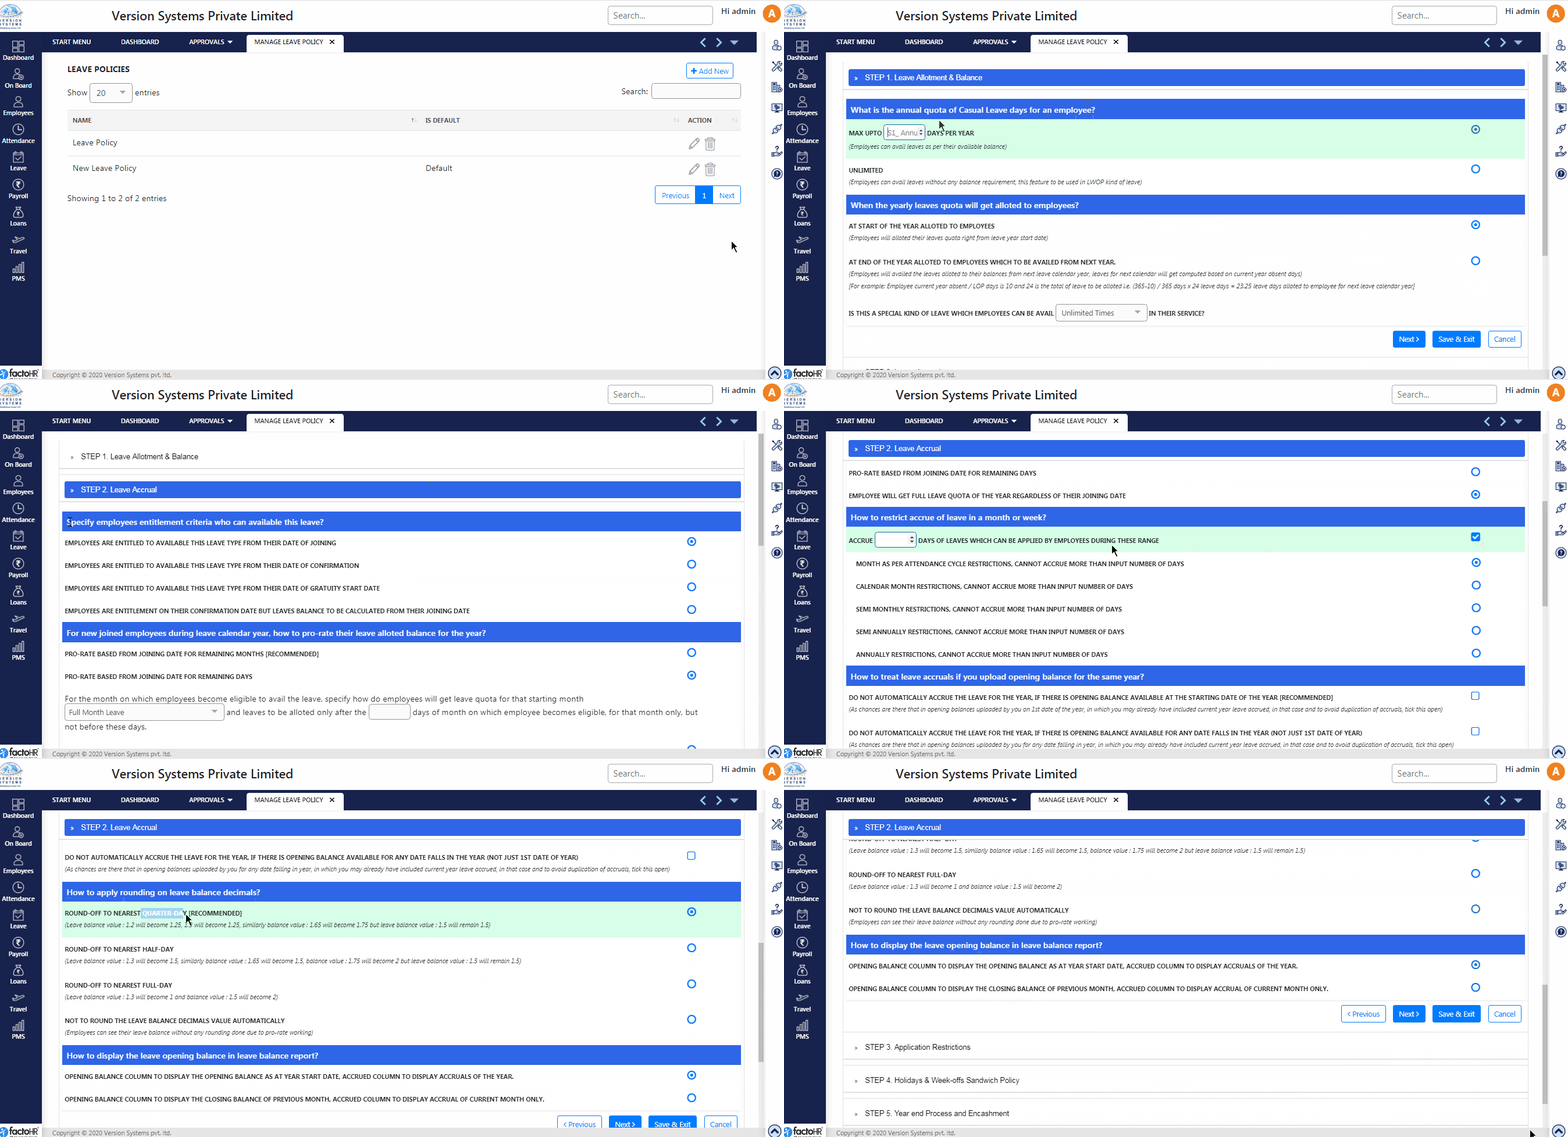
- STEP 2 – Leave Accrual. There are 7 parts to define Leave Accrual.
- In Part 1 select a criteria when can employees avail this particular leave type – From their Joining date, Confirmation date, Gratuity Start Date or Entitled to avail on Confirmation but calculated from Joining date.
- Part 2 is to allot pro-rate leave balance to new joined employee. Three options given to choose Pro-rate leaves from joining date for remaining Months or Days or assign Full Leave Quota.
- In first two options you can mention how employees can get leave quota for the first month (month in which he becomes eligible) based on time period from the drop down list like Full Month, Half Month, etc. And mention after how many Days of a month, in a box, employee becomes eligible for leaves.
- In Part 3 restrict number of days for accrue leave on a Monthly, Semi Monthly, Semi Annually or Annually
- Part 4 is for restriction of leave accruals if you are uploading leave opening balance for the same year.
- These two options restrict automatic accrual of leaves, if the opening leave balance is available from the start of the year or for any date in a year.
- In Part 5 you can select option to round-off the leave balance to nearest quarter day, half day, full day or not to round the balance.
- Part 6 will allow you to make selection for report columns, whether you want to view year-wise opening balance and accrual or to view month-wise opening (which is closing of last month) and accrual for the month.
Please refer to the visual demo for Step 1 & 2

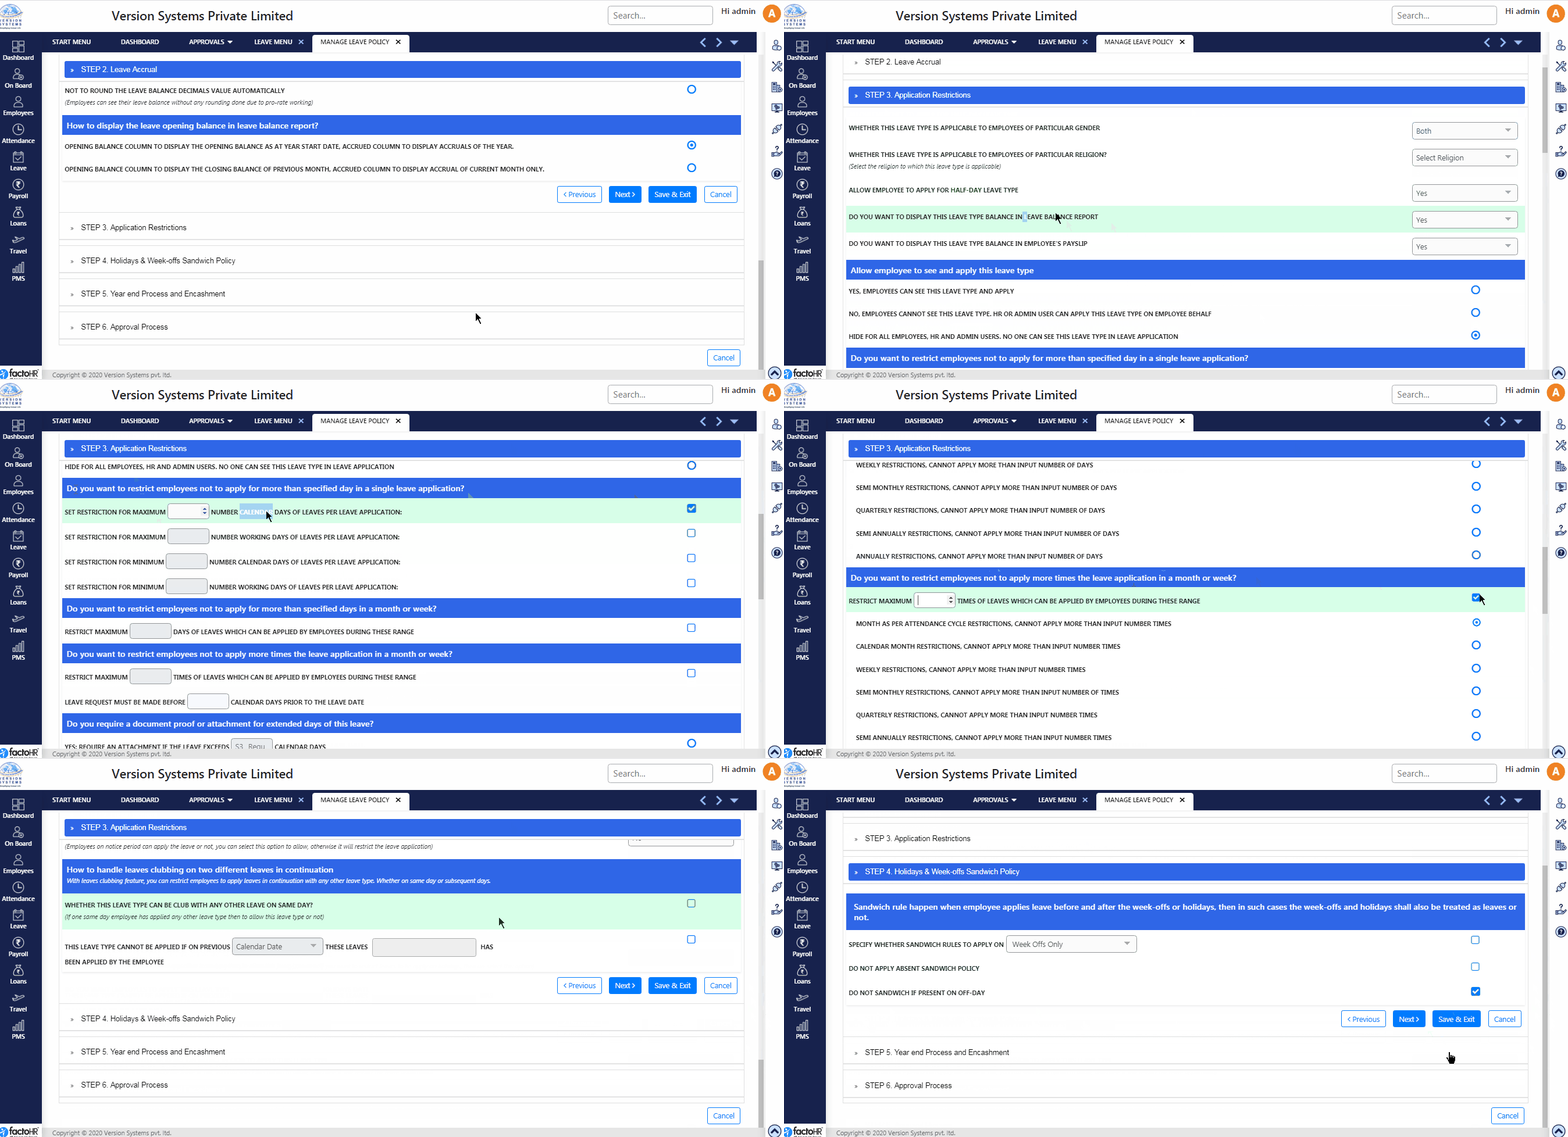
- STEP 3 – Application Restrictions. There are 8 parts in this step.
- Part 1 – Here you can apply Restriction on Leave Application based on Gender, Religion.
- Half day leave application can be allowed from here.
- If you want to allow leave balance to be displayed on Balance Report or Payslip then it can be set from here.
- Part 2 – This part will allow you to hide leave type. If you select first option then employees can view and apply this leave. In second option employees cannot see leave type but Admin or HR can view and apply on the behalf of the employees. In third option it is hide from employees, HR and Admin. So no one can view this leave type in leave application.
- In Part 3 you can restrict employees to apply number of leaves in a single application. Set minimum and maximum Calendar Days or Working Days per application.
- In Part 4 you can restrict employee’s leave application for Specific Days in a month, a week, semi monthly, quarterly, semi annually or annually.
- In Part 5 you can restrict employee’s leave application for Specific Number of Times in a month, a week, semi monthly, quarterly, semi annually or annually.
- How many days in advance Leave Application is to be made before actual Leave date, can be set from here.
- Part 6 – Whether employees required to submit document proof or not if the leave applied them is more than specified calendar days.
- Select first option if document proof is required and mention number of Calendar days beyond which proof is required. If proof is not required then select second option.
- Part 7 – This is an optional setting. Do you want employees to get prompt message or not, when application is made, can be set from here.
- Further you can set restrictions like employees can apply Leave Type or not on employee’s Holiday Date, Restricted Holiday, Week-off or during Notice Period.
- Part 8 – This will help you to Club different leave types. Select first check box if you want to permit employees to apply for more than one leave type on the same day.
- In second option you can restrict employees for clubbing certain leave types like taking Casual leave on previous day and applying for Sick Leave next day. But there is option given to allow such leaves based on previous day leave balance.
- STEP 4 – Holidays and Week-Offs Sandwich Policy. If employees takes leave before and after week-offs or holiday then according to this rule week-offs and holiday will consider as leave.
- In first option drop down list is given. You can select whether sandwich policy will be applicable on week-offs or holidays or both.
- In first option there are further three options given like sandwich policy will be applicable between two full days leave or two half days depending upon first or second half selected.
- In second option sandwich policy is not applicable if employee was Absent.
- In third option sandwich policy is not applicable if employee is Present on Off day.
Please refer to the visual demo for Step 3 & 4

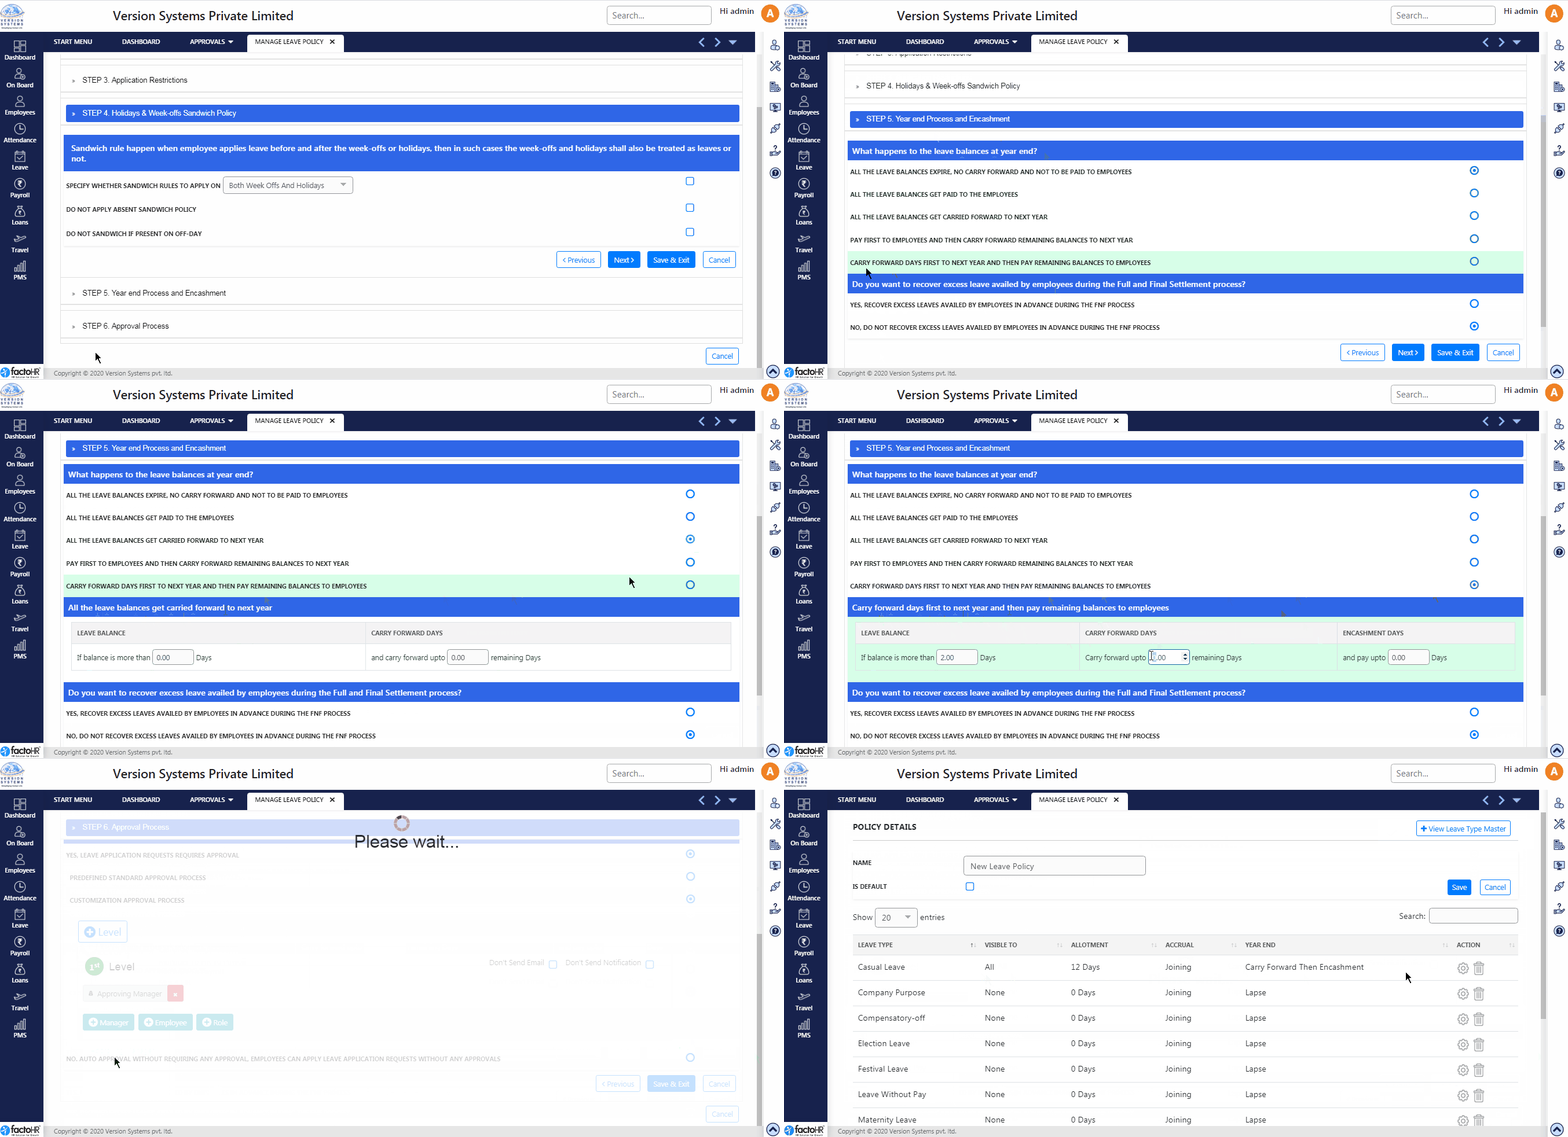
- STEP 5 – Year End Process and Encahsment. There are two parts. When employees do not use their yearly leave balance then those leaves can get enchased, carry forward or expired.
- Part 1 – If you do not want to encash or carry forward leave balance then select first option.
- If you want to encash the remaining leave balance then select second option. A small table will appear where you can set minimum days under Leave Balance column whichemployee requires for encashment to happen.
- Under Encashment Days column enter maximum days for which company will en-cash the leave. For e.g., an employee has 10 leave in his balance but company only provide encashment for 6 days then rest or the 4 days will get expired.
- In third option same table will appear but it is to Carry Forward the remaining leaves. Maximum leave days set by you will get carry forward for employees.
- In fourth option you can first en-cash leaves and carry forward remaining leaves. Set the minimum required leaves under first column. In second column set maximum days in pay up-to leaves for encashment and rest will get carry forward for amount of days set by you.
- In fifth option first preference will be given to carry forward leave and then to encashment.
- In Part 2 there is option to recover or not to recover excess leave, which employee has taken in advance , during Full and Final settlement process.
- STEP 6 – Approval Process. If employees need approval select first option. It is further divided into two parts. In predefined workflow select approval manager from drop down list or use Customization Approval Process where you can create level and select approving managers.
- In Auto Approval, employee can apply attendance correction without any approvals.
- To configure other Leave Types follow the same steps.
Please refer to the visual demo for Step 5 & 6

Previous Step:- Assign Leave Year Next Step:- Assign Leave Policy